|
|

|
|
The
following forms are provided in ALL versions of EASITax;
|
1099-NEC |
W2 |
1099-DIV |
1099-INT |
1099-MISC |
1099-S |
|
1096 |
W3 |
1099-R |
1098 |
1099-C |
|
Importing
from Excel (.csv)
Step
1 Use
the Data/Import option to export at least one sample data record from
EASITax. Then, open both the exported file and your data spreadsheet
with Excel.
Step
2 Replace
column names in row 1 of your data spreadsheet with the equivalent
column name from the export file. Column order does not matter and
all unused columns should be removed.
Step
3 Set
numeric column formats to General, set zip-code and EIN columns
formats to text.
Step
4 Save
modified data file as a .csv file and then use the Data/Import to
read it into EASITax. Discard the exported file, it is no longer
needed.
That's It! Changes can be made in EASITax, or you can
update in Excel and re-import to EASITax. TIP:
The Tools menu
provides an option to empty the database for re-importing.
Data
can be entered into the fields on top of the screen or directly into
its associated spreadsheet column. As data is entered, values are
synchronized as you type. The toolbar on the left side of the screen
represent all of the criteria necessary in order to perform all of
the functions needed in order to fill out, print, and file your 1099
or W2 information to the IRS. Each of these options are described
below;
|
|
Displays a list of forms that
are available in EASITax by tax year. |
|
|
Adds a new row to the
spreadsheet and copies the payer data from the selected
row. |
|
|
Saves the current edits to
the database. |
|
|
Provides a list of
plain-paper and pre-printed format along with options for choosing
which records to print. |
|
|
Deletes all selected
rows. |
|
|
Totals 1099 or W2 forms and
creates or updates records in the 1096 or W3 form database.. A
record in the W3 or 1096 form database will be created or updated
for each payer. |
|
|
Generates an IRS compatible text file for uploading to the IRS FIRE system. Any data that does not pass auditing will generate an error log file. The IRS file is generated once no errors are encountered. Click for more detail on this option. |
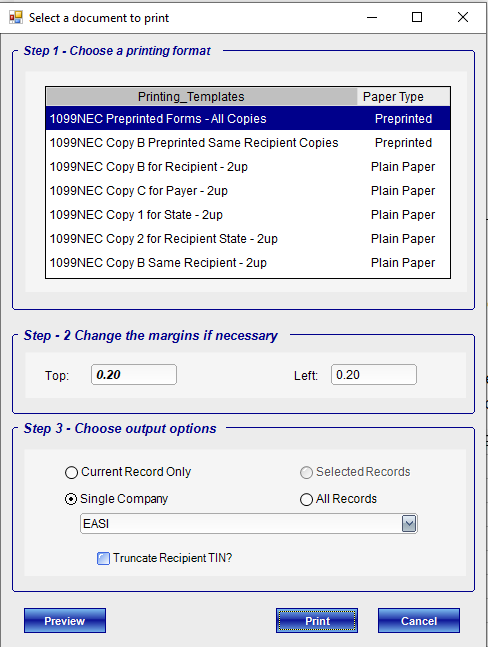
The 'Print' button displays a list of printing formats and settings available for this form. Formats are provided to print directly into the blanks of the official IRS forms or to print on plain-paper.
|
|
|
NOTE:
Federal Copy A and 1096 MUST be printed on the official IRS
pre-printed forms (red magnetic ink) and will not be accepted on
plain paper formats. E-filers do not need to submit any paper forms.
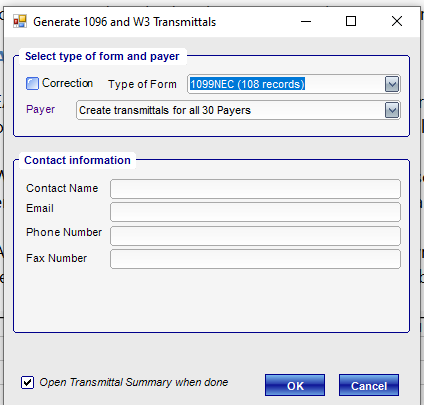
This
option creates the 1096 and W3 Transmittal Summary records by
counting and totaling the amount fields on each form. This should be
done AFTER all of the forms have been filled and amounts verified.
|
|
|
Status
is reported once completed and the user is given an option to open
the transmittal form database. This is the equivalent of clicking the
'Open' button and selecting the '1096 Transmittal Summary' or 'W3
Transmittal Summary' to show the equivalent records that were
generated.
NOTE: This option MUST be redone if
there are any changes made after it was last ran. Also, it MUST be up
to date before running e-file.
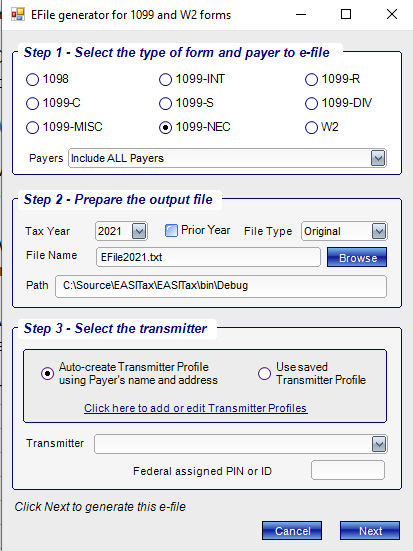
You will need to obtain a PIN number from the IRS FIRE for electronic filing
Make sure all of the recipient forms are in the database and the amounts are correct
Generate your
Transmittal Summary records
Clicking the “E-File”
button will display the following screen;
|
|
|
The 'Next' button
will display a progress screen while file generation is in progress.
The data will be audited and any errors will be listed and also
written to a .log file that can be opened in Notepad. The IRS file
will only be generated if the audit reports no errors.
Copying
data from last year
On
start-up, if EASITax detects data from the previous tax year, a
prompt will ask if you wish to convert the data to the current tax
year. This is useful if most of your recipients did not change.
Check the “Do not ask again” box to eliminate the
start-up prompt..
Data from ALL of the forms used last year will
be added to the current tax year. Amount fields will be empty so
you can easily update amounts for each recipient.
This option
can also be selected from the Tools menu so you can browse to an
alternate file location to select the database, EASITaxYYYY.mdb,
(YYYY=tax year).
Default folder locations are described in the
section “Backing up your database”.
Backing
Up Your Database
The
simplest way to ensure that your data is safely stored away is to
simply use the Export option to generate a .csv that is compatible
both with EASITax and MsExcel.
In some cases however, you
may need to move your current and previous years data to another
machine or a network server. The folder and file locations are
described below;
All folders and data files are shown relative
to the path where EASITax is installed on your computer.
The
easiest way to find the install directory is to right click your
mouse over the desktop icon you use to start EASITax and then select
the 'Open File Location' option from the menu that appears. A folder
view to the installed folder will be opened.
The 'Solutions'
folder contains the data for the current and previous tax years. Each
tax year has its own folder tree labeled as 'EASITaxYYYY' (where YYYY
is the tax year).
Copy
the entire Solutions directory to save ALL data for ALL tax
years.
Copy the EASITaxYYYY folder to backup a single tax year